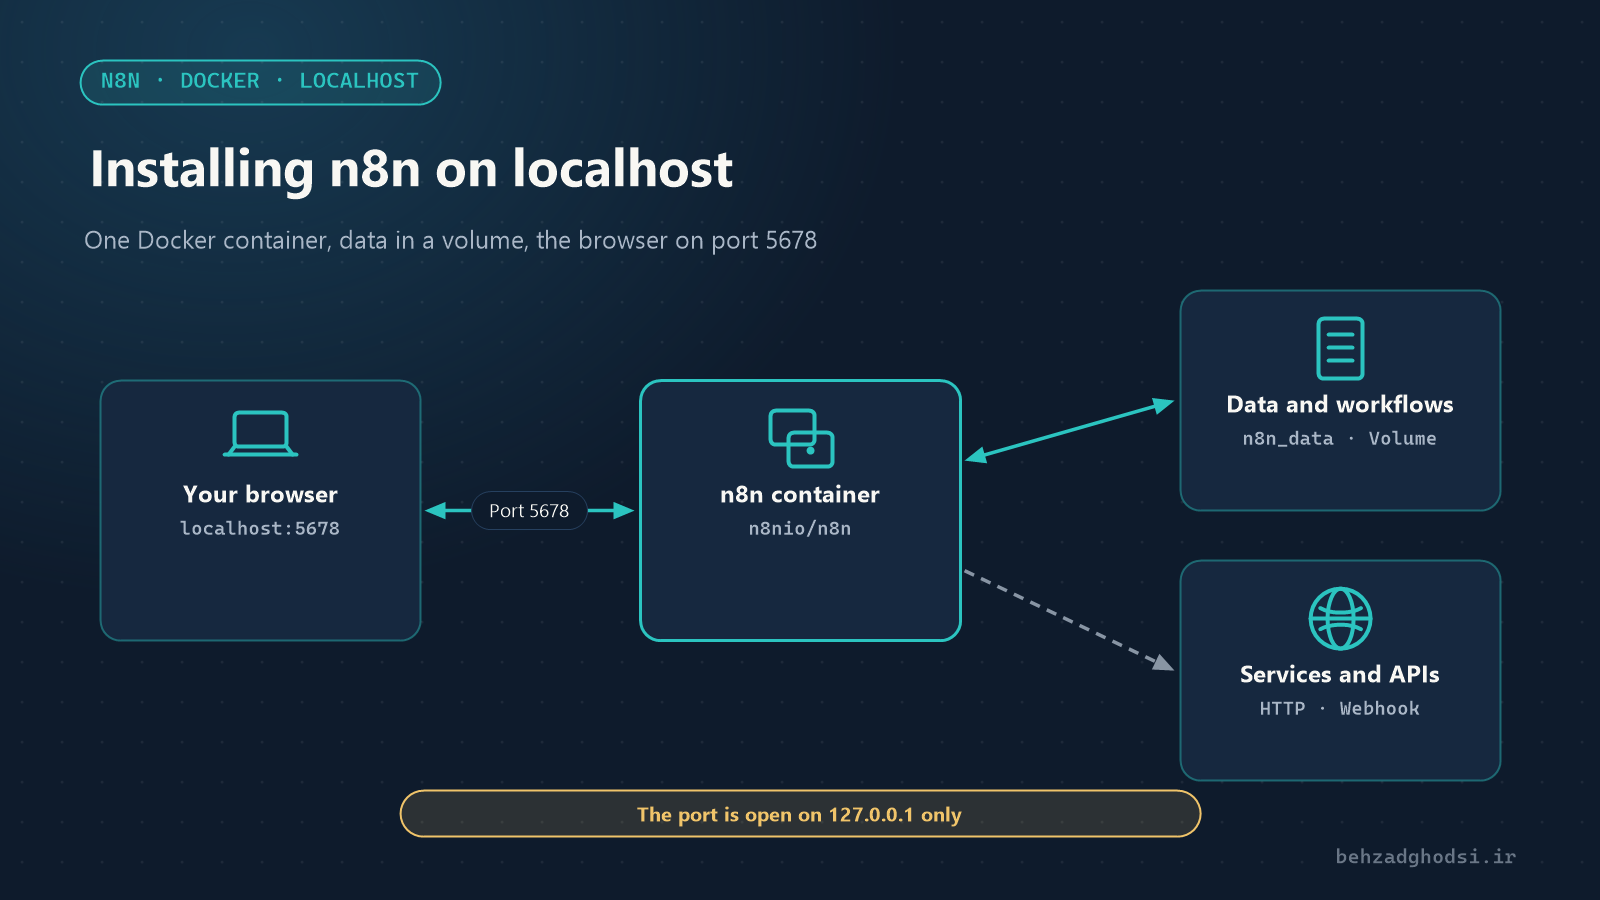
n8n is a workflow automation tool: it connects services and applications so that repetitive work happens on its own; for example, every new form on your website is added to a spreadsheet and an expert gets a message, or a report is ready every morning. n8n can be installed on your organisation’s own server, which makes it attractive for teams that do not want their data to go to outside services.
This article explains how to install n8n on your own computer (localhost), to learn, build and test workflows before moving them to a server. The commands follow the official n8n documentation at the time of writing.
Which installation method?
There are three main options:
- Docker: the method n8n itself recommends. n8n runs separately from the rest of the system, is easy to install and remove, and does not depend on your computer’s Node.js version.
- Docker Compose: still Docker, but the settings live in a file and n8n starts again on its own after the computer restarts. The best choice for everyday use.
- npm: if you already have Node.js and only want a quick try. According to the n8n documentation, npm installs are being phased out from version 3; for long-term use choose Docker.
Prerequisites
- Windows and macOS: install Docker Desktop; Docker Compose comes with it. On Windows, Docker Desktop uses WSL 2.
- Linux without a desktop: install Docker Engine and the Docker Compose plugin separately.
- For npm: Node.js 20.19 to 24.
After installing Docker, run these commands in a terminal to check that it works:
docker --version
docker compose version
Method 1: run n8n with Docker
First create a volume so that data and workflows survive when the container is removed:
docker volume create n8n_dataThen run n8n (on Windows, write it on one line without the \):
docker run -it --rm \
  --name n8n \
  -p 127.0.0.1:5678:5678 \
  -e GENERIC_TIMEZONE="Europe/London" \
  -e TZ="Europe/London" \
  -e N8N_ENFORCE_SETTINGS_FILE_PERMISSIONS=true \
  -v n8n_data:/home/node/.n8n \
  n8nio/n8n
What each part does:
-p 127.0.0.1:5678:5678: port 5678 is opened on this computer only, so others on the network cannot reach it. The n8n documentation uses-p 5678:5678, which opens the port on every network interface; for localhost, restricting it is safer.GENERIC_TIMEZONE: the time zone used by scheduled nodes such as Schedule Trigger. Without it, a workflow meant to run at 8 a.m. runs at a different hour. Use your own time zone from the tz database.TZ: the time zone of the system inside the container.-v n8n_data:/home/node/.n8n: all n8n data (database, workflows, credentials and the encryption key) is stored in the volume.--rm: the container is removed when it stops; the data stays in the volume.
Now open your browser at http://localhost:5678. To stop n8n, press Ctrl+C in the same terminal.
Method 2: Docker Compose for everyday use
Create a folder, for example n8n, and inside it a file named compose.yaml with this content:
services:
  n8n:
    image: n8nio/n8n
    container_name: n8n
    restart: unless-stopped
    ports:
      - "127.0.0.1:5678:5678"
    environment:
      - GENERIC_TIMEZONE=Europe/London
      - TZ=Europe/London
      - N8N_ENFORCE_SETTINGS_FILE_PERMISSIONS=true
    volumes:
      - n8n_data:/home/node/.n8n

volumes:
  n8n_data:
In the same folder:
docker compose up -dn8n runs in the background, and with restart: unless-stopped it starts again after the computer reboots. A few useful commands:
docker compose ps
docker compose logs -f n8n
docker compose down
The first shows the status, the second the logs, and the third stops n8n; the data stays in the volume.
Method 3: install with npm
If you have a suitable Node.js version, try it without installing:
npx n8nOr install it permanently and run it:
npm install n8n -g
n8n start
With this method the data is stored in the .n8n folder inside your user folder.
First sign-in
When you open http://localhost:5678, n8n asks you to create the owner account: email, name and password. This is the administrator of your n8n instance; use a strong password, even on localhost.
Build a simple test workflow
- Click Create Workflow.
- Add a Manual Trigger node so the workflow runs at the click of a button.
- Add an HTTP Request node and request a public address, such as a test API, with the GET method.
- Click Execute Workflow; the output of each node is shown next to it.
Once it works, you can replace the Manual Trigger with a Schedule Trigger so the workflow runs on its own at a set time.
Where is the data, and how do I back it up?
By default n8n uses an SQLite database inside the .n8n folder. With Docker all of this lives in the n8n_data volume. To back up the whole volume (on Linux and macOS):
docker run --rm -v n8n_data:/data -v "$PWD":/backup alpine tar czf /backup/n8n-backup.tgz -C /data .If you only need the workflows, export them from inside the container:
docker exec -u node n8n n8n export:workflow --all --output=/home/node/.n8n/workflows-backup.jsonKeep the encryption key file (config inside .n8n) as well. Without it, saved credentials cannot be decrypted on a new installation.
Updating n8n
With Docker Compose:
docker compose pull
docker compose down
docker compose up -d
With plain Docker, pull the new image with docker pull n8nio/n8n and run the container again. With npm, npm update -g n8n is enough. Before a major update, read the release notes and take a backup.
Common errors
- Port 5678 is already in use: another program uses this port. Change the left-hand port, for example
127.0.0.1:5679:5678, and open n8n athttp://localhost:5679. - Schedules run at the wrong time:
GENERIC_TIMEZONEis missing or wrong. - You cannot sign in from another computer on the network: over HTTP, n8n only allows sign-in from localhost itself, because it needs a secure cookie. The right way to reach it from the network is a server installation with HTTPS. Turning this off with
N8N_SECURE_COOKIE=falseis acceptable only for testing on a trusted internal network. - Webhooks from outside do not work:
localhostcannot be reached from the internet. To receive webhooks from outside services, n8n must be installed on a server with a domain and HTTPS. - Settings file permission error: set
N8N_ENFORCE_SETTINGS_FILE_PERMISSIONS=trueas in the examples above.
Security tips
- Open the n8n port on
127.0.0.1only. n8n connects to your organisation’s accounts and data and should not be reachable on the network or the internet without HTTPS and a strong password. - Keep credentials only in n8n’s Credentials section, not in node text.
- For real use in an organisation, install n8n on a separate server with HTTPS, regular backups and restricted access.
From localhost to real business automation
Localhost is great for learning and building prototypes; but a workflow that has to run around the clock, receive webhooks or connect to internal systems needs a server, a domain, HTTPS and a backup plan. If you want to automate your organisation’s repetitive work with n8n or AI agents, see AI-based business automation and AI agent development. To compare the AI models you can use in n8n, read Claude, ChatGPT, Gemini, Grok and Codex compared.