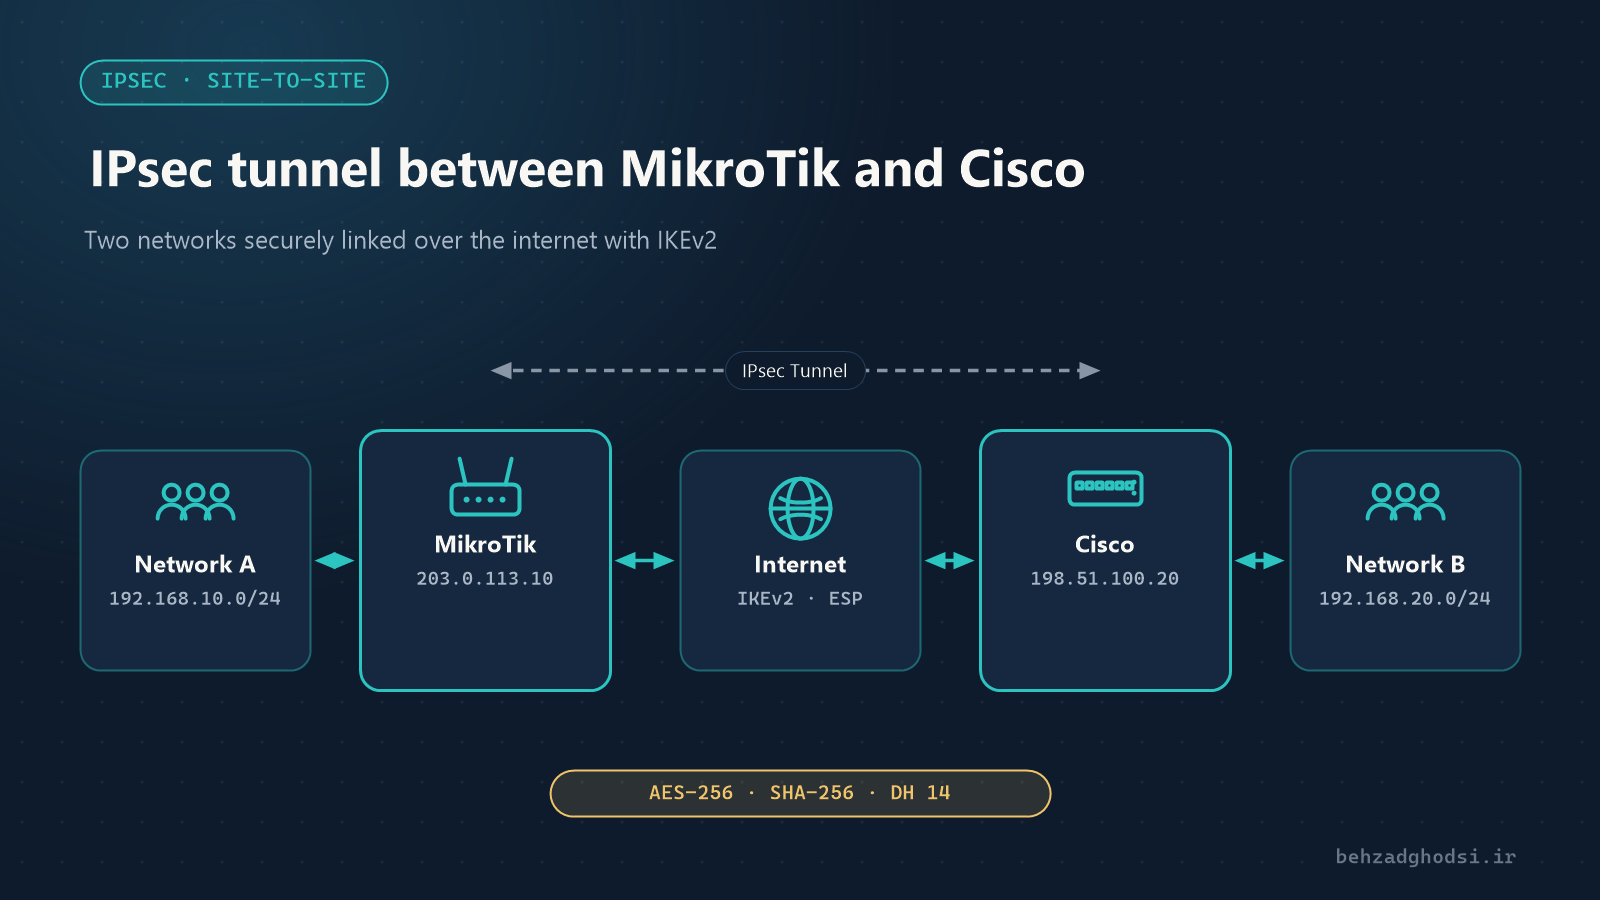
When head office has a MikroTik router and the branch or a partner company has a Cisco router, the most reliable way to connect the two networks is a site-to-site IPsec tunnel. IPsec is a standard that both brands support; only the setting names differ between the two sides, and they must match exactly.
In this guide we build the tunnel with IKEv2 and a pre-shared key. The commands are written for RouterOS 7 and Cisco IOS / IOS-XE.
The scenario
- Site A (MikroTik): public address
203.0.113.10, internal network192.168.10.0/24 - Site B (Cisco): public address
198.51.100.20, internal network192.168.20.0/24, internet interfaceGigabitEthernet0/0
The addresses are examples; use your own. The two internal networks must not use the same address range.
Prerequisites
- Both routers have a static public IP. If one is behind NAT, UDP ports 500 and 4500 must reach it.
- Both routers’ clocks are correct (NTP).
- On the Cisco, the IOS version supports IKEv2 (IOS 15 or later with the Security licence).
- Prepare a long, random pre-shared key. This article uses
Str0ng-Shared-Key; use your own.
The parameters that must match on both sides
Mismatched parameters are the most common reason a tunnel will not come up. Write them down before you start:
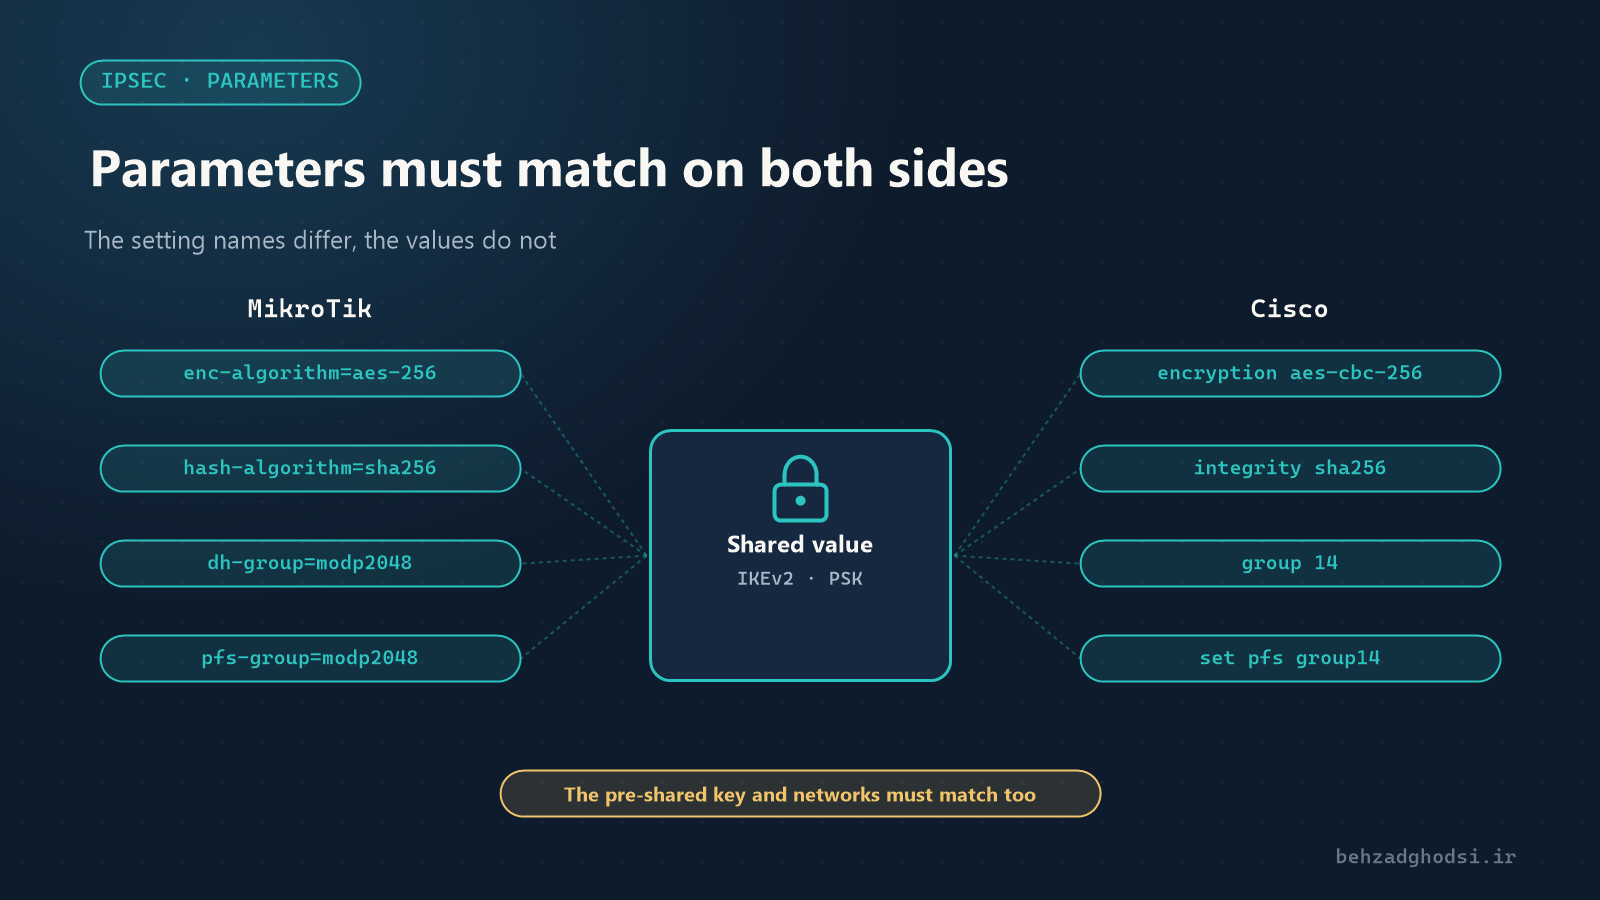
- Phase 1 (IKE): IKEv2, AES-256 encryption, SHA-256 hash, Diffie-Hellman group 14 (
modp2048on MikroTik), lifetime 24 hours - Phase 2 (IPsec / ESP): AES-256 encryption, SHA-256 authentication, PFS group 14, lifetime 1 hour
- Authentication: the same pre-shared key
- Networks: each side must define the other’s networks as an exact mirror of its own
The order of the steps
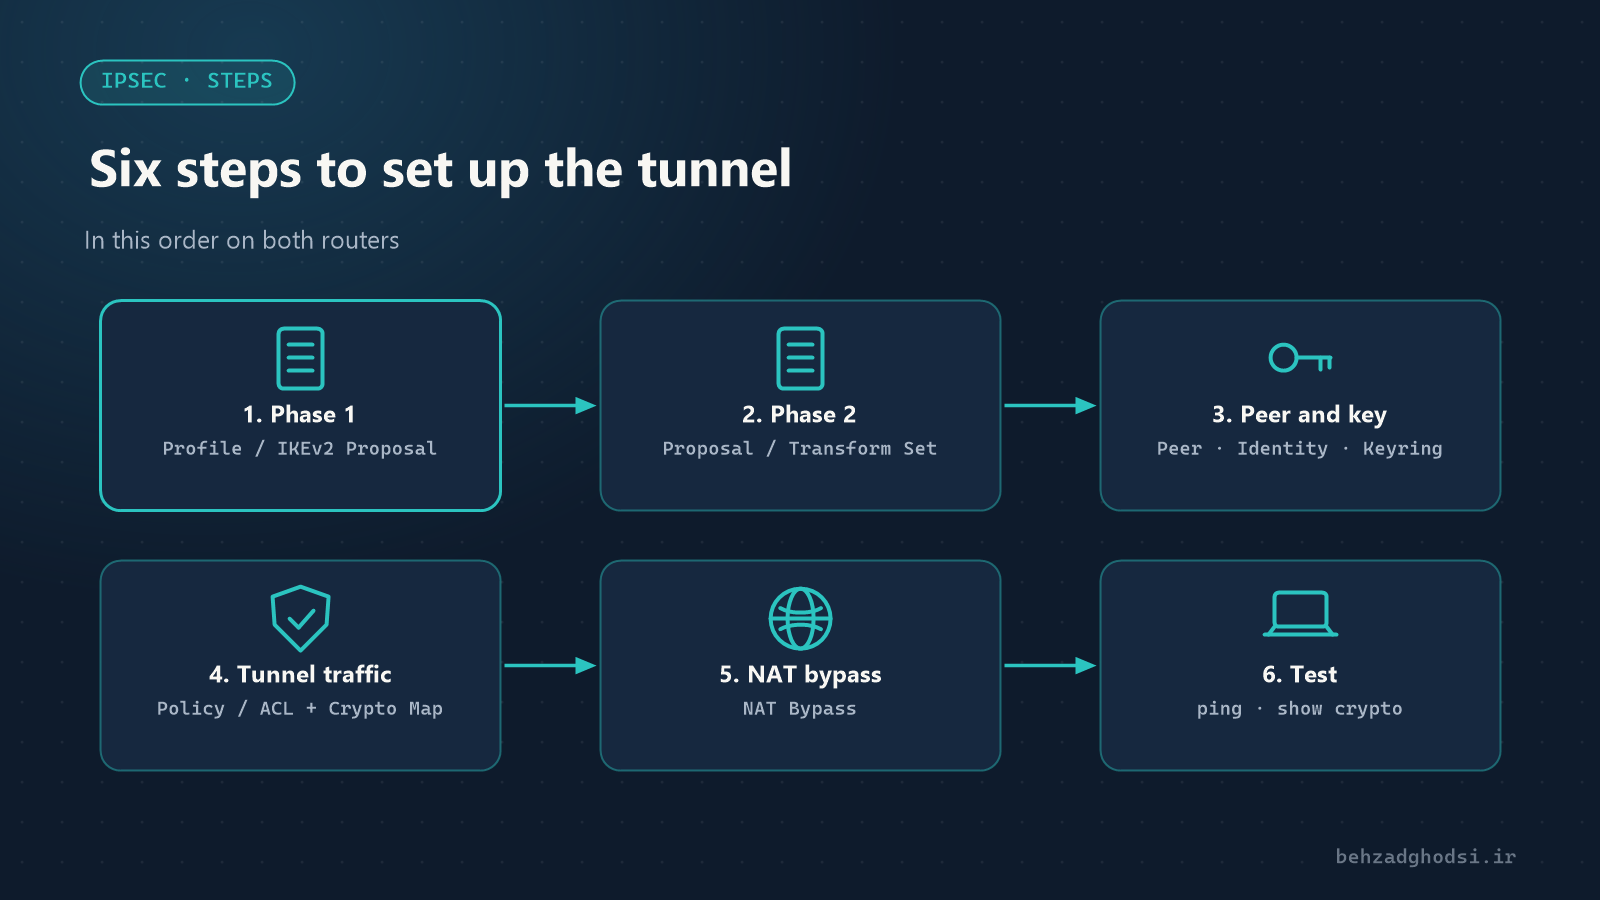
Part one: MikroTik configuration
All of these settings are also available in Winbox under IP → IPsec; the tab name is given next to each command.
1. Profile (phase 1)
The Profiles tab:
/ip ipsec profile add name=cisco-p1 enc-algorithm=aes-256 hash-algorithm=sha256 dh-group=modp2048 lifetime=1d dpd-interval=30s dpd-maximum-failures=52. Proposal (phase 2)
The Proposals tab:
/ip ipsec proposal add name=cisco-p2 enc-algorithms=aes-256-cbc auth-algorithms=sha256 pfs-group=modp2048 lifetime=1h3. Peer and identity
The Peers tab defines the remote router:
/ip ipsec peer add name=cisco address=198.51.100.20/32 exchange-mode=ike2 profile=cisco-p1The Identities tab holds the pre-shared key:
/ip ipsec identity add peer=cisco auth-method=pre-shared-key secret="Str0ng-Shared-Key"4. Policy
The Policies tab defines which traffic is encrypted:
/ip ipsec policy add peer=cisco tunnel=yes src-address=192.168.10.0/24 dst-address=192.168.20.0/24 proposal=cisco-p2 action=encrypt level=require5. NAT bypass
Without this rule, traffic to the remote network is masqueraded before it reaches IPsec and the tunnel does not work. The rule must sit above masquerade:
/ip firewall nat add chain=srcnat action=accept src-address=192.168.10.0/24 dst-address=192.168.20.0/24 place-before=0 comment="IPsec bypass to Cisco"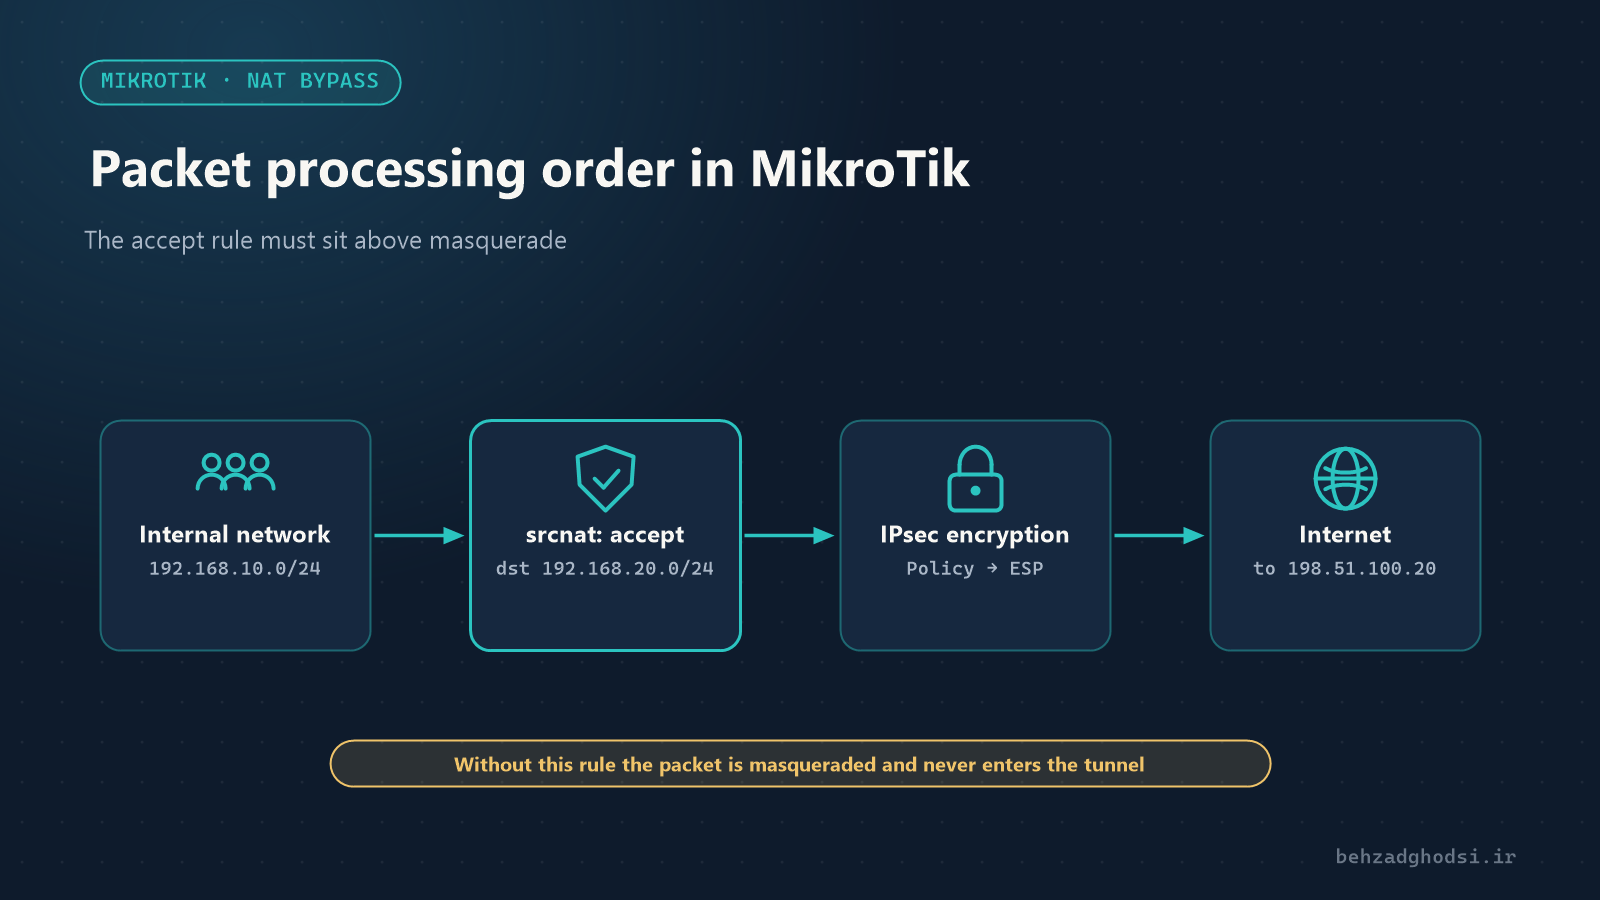
6. Firewall rules
Allow the remote router to establish the tunnel (place these rules above the drop rule in the input chain):
/ip firewall filter add chain=input action=accept protocol=udp dst-port=500,4500 src-address=198.51.100.20 comment="IKE from Cisco"
/ip firewall filter add chain=input action=accept protocol=ipsec-esp src-address=198.51.100.20 comment="ESP from Cisco"
If FastTrack is enabled, exclude the tunnel traffic from it; otherwise connections break after a few packets. These two rules must sit above the fasttrack rule in the forward chain:
/ip firewall filter add chain=forward action=accept src-address=192.168.10.0/24 dst-address=192.168.20.0/24 comment="IPsec out, before fasttrack"
/ip firewall filter add chain=forward action=accept src-address=192.168.20.0/24 dst-address=192.168.10.0/24 comment="IPsec in, before fasttrack"
Part two: Cisco configuration
Enter configuration mode (configure terminal) and apply the following steps in order.
1. IKEv2 proposal and policy (phase 1)
crypto ikev2 proposal MT-PROP
 encryption aes-cbc-256
 integrity sha256
 group 14
!
crypto ikev2 policy MT-POL
 proposal MT-PROP
2. Keyring and profile
crypto ikev2 keyring MT-KEYS
 peer MIKROTIK
  address 203.0.113.10
  pre-shared-key Str0ng-Shared-Key
!
crypto ikev2 profile MT-PROF
 match identity remote address 203.0.113.10 255.255.255.255
 authentication remote pre-share
 authentication local pre-share
 keyring local MT-KEYS
 lifetime 86400
 dpd 30 5 on-demand
3. Transform set (phase 2)
crypto ipsec transform-set MT-TS esp-aes 256 esp-sha256-hmac
 mode tunnel
4. Interesting traffic (ACL)
This ACL must mirror the MikroTik policy: source is the Cisco network, destination the MikroTik network.
ip access-list extended VPN-TO-MIKROTIK
 permit ip 192.168.20.0 0.0.0.255 192.168.10.0 0.0.0.255
5. Crypto map, applied to the internet interface
crypto map MT-MAP 10 ipsec-isakmp
 set peer 203.0.113.10
 set transform-set MT-TS
 set ikev2-profile MT-PROF
 set pfs group14
 set security-association lifetime seconds 3600
 match address VPN-TO-MIKROTIK
!
interface GigabitEthernet0/0
 crypto map MT-MAP
6. NAT exemption
On the Cisco too, tunnel traffic must not be NATed. In the NAT ACL, deny the tunnel traffic first:
ip access-list extended NAT-INTERNET
 deny ip 192.168.20.0 0.0.0.255 192.168.10.0 0.0.0.255
 permit ip 192.168.20.0 0.0.0.255 any
!
ip nat inside source list NAT-INTERNET interface GigabitEthernet0/0 overload
If the internet interface has an inbound ACL, permit UDP 500, UDP 4500 and the ESP protocol from the MikroTik’s address:
ip access-list extended OUTSIDE-IN
 permit udp host 203.0.113.10 any eq isakmp
 permit udp host 203.0.113.10 any eq non500-isakmp
 permit esp host 203.0.113.10 any
Finally save the configuration:
end
write memory
Testing the tunnel
The tunnel comes up with the first traffic between the two networks. Ping with an internal network address as the source; a ping from the router’s public address does not enter the tunnel.
From the MikroTik:
/ping 192.168.20.1 src-address=192.168.10.1From the Cisco:
ping 192.168.10.1 source 192.168.20.1Checking on the MikroTik
/ip ipsec active-peers print
/ip ipsec installed-sa print
/ip ipsec policy print
In active-peers the state should be established, and in the policy output the PH2-STATE column should show established. In installed-sa you see two SAs (one per direction) whose byte counters rise as you ping.
Checking on the Cisco
show crypto ikev2 sa
show crypto ipsec sa
show crypto session
In show crypto ikev2 sa the status should be READY. In show crypto ipsec sa both the pkts encaps and pkts decaps counters should increase; if only one rises, the problem is on the return path or the NAT on the other side.
Troubleshooting
- NO_PROPOSAL_CHOSEN: the phase 1 or phase 2 parameters do not match. Compare encryption, hash, DH group and PFS again.
- AUTHENTICATION_FAILED: the pre-shared keys differ, or the peer address in the keyring and
match identityis wrong. - TS_UNACCEPTABLE: the MikroTik policy networks and the Cisco ACL are not mirrors of each other; even a different mask (for example
/24and/16) stops the tunnel. - The tunnel is up but ping gets no reply: check the NAT bypass rule on both sides; on MikroTik it must be above masquerade.
- Connections come up and drop after a few seconds: FastTrack on the MikroTik; put the forward rules above fasttrack.
- Ping works but websites and large files do not load: it is an MTU problem. Clamp the MSS on the MikroTik, and on the Cisco configure
ip tcp adjust-mss 1360on the internal interface:
/ip firewall mangle add chain=forward action=change-mss new-mss=1360 protocol=tcp tcp-flags=syn tcp-mss=1361-65535 src-address=192.168.10.0/24 dst-address=192.168.20.0/24 passthrough=yes- The tunnel drops every few hours: make the lifetimes on both sides the same and keep DPD enabled on both.
Seeing error details
On the MikroTik, enable IPsec logging, and turn it off again once the problem is fixed:
/system logging add topics=ipsec,!packet
/log print where topics~"ipsec"
On the Cisco:
debug crypto ikev2
undebug all
If the Cisco router has no IKEv2
On older IOS versions you have to use IKEv1. On the MikroTik, set exchange-mode=main on the peer, and on the Cisco define the ISAKMP policy and key like this instead of the IKEv2 sections:
crypto isakmp policy 10
 encryption aes 256
 hash sha256
 authentication pre-share
 group 14
 lifetime 86400
!
crypto isakmp key Str0ng-Shared-Key address 203.0.113.10
The remaining steps (transform set, ACL, crypto map and NAT) stay the same; just remove the set ikev2-profile line from the crypto map.
Security tips
- Do not use old algorithms such as DES, 3DES, MD5 and DH group 2.
- Choose a long, random pre-shared key and never send it by email or messaging apps.
- Limit IKE access to the remote router’s address, not the whole internet.
- After the set-up, back up the configuration of both routers.
An IPsec tunnel between MikroTik and Cisco depends on four things: identical phase 1 and phase 2 parameters, the same pre-shared key, networks defined as mirrors of each other, and NAT bypass on both sides. Get these four right and the tunnel comes up with the first ping. To learn about NAT types on MikroTik, read NAT types on MikroTik, and for router hardening, Network security with MikroTik.