The managing director wants to see the cameras from home, the IT engineer needs to reach the server at night, and the accountant needs the accounting software from outside. MikroTik offers three main ways to do this. The right choice depends on both convenience and security.
Before you start: do you have a public IP?
All the methods in this article assume your router can be reached from the internet:
- If your connection has a static IP, you are fine.
- If your IP is public but changing, use DDNS (explained below).
- If the provider gave you a private IP (CGNAT; the router’s WAN address starts with
10.or100.64), no connection from outside can reach the router. In that case either ask the provider for a public IP, or put a server with a public IP in between (for example a CHR on a virtual server) and have your router connect out to it over VPN.
Method 1: port forwarding (simple, but risky)
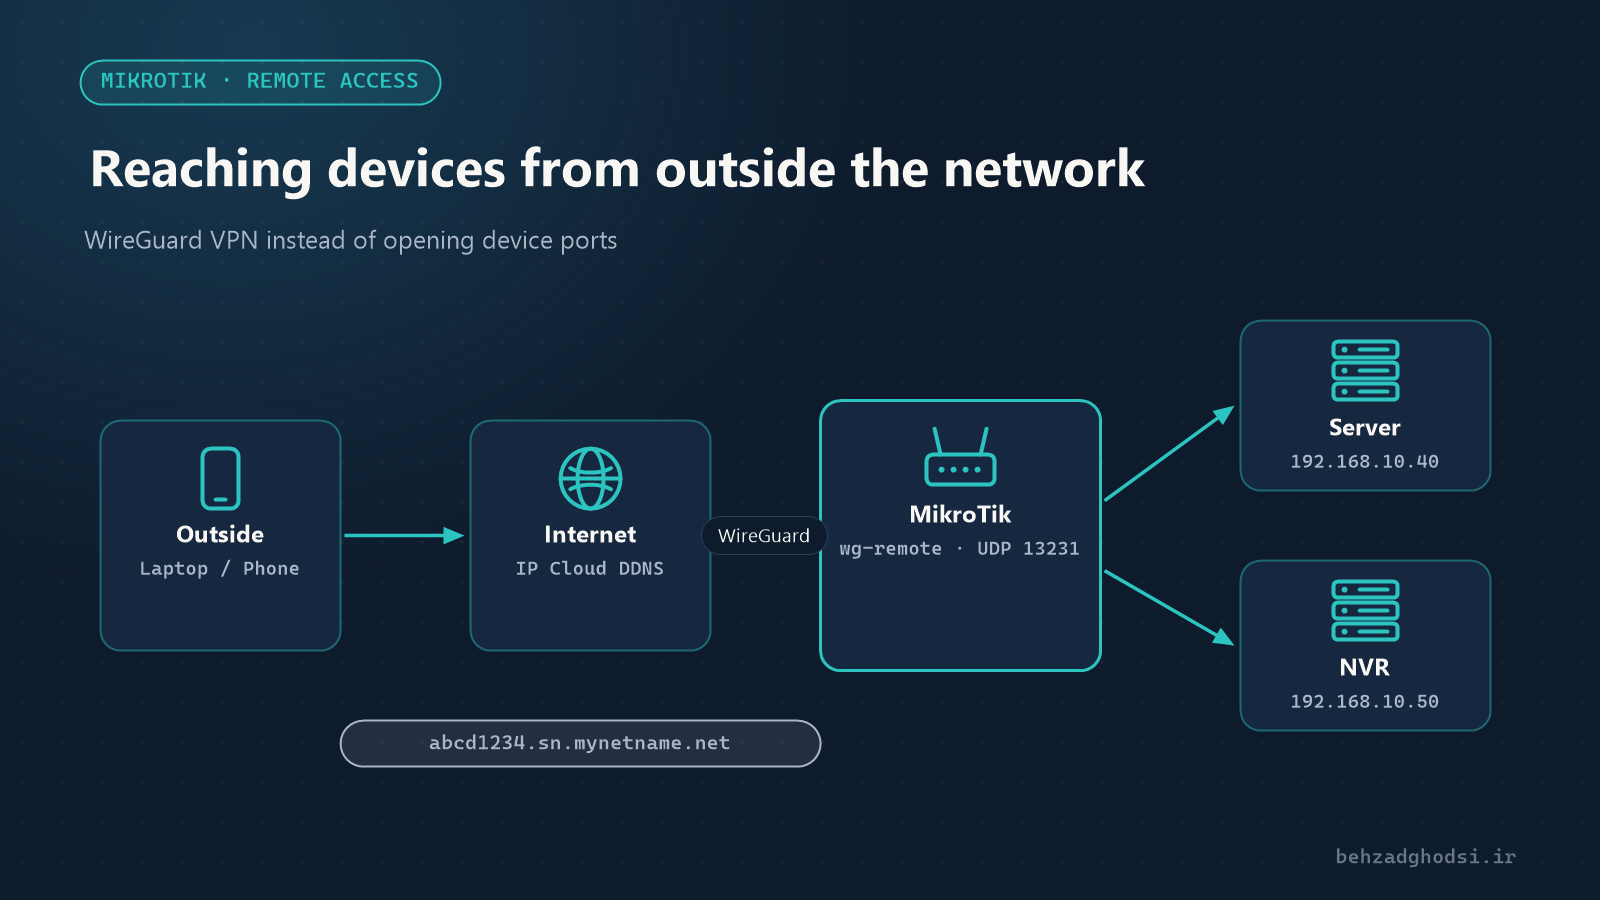
With dstnat, a port on the public IP is passed to an internal device, for example the camera NVR at 192.168.10.50:
/ip firewall nat add chain=dstnat in-interface-list=WAN protocol=tcp dst-port=8000 action=dst-nat to-addresses=192.168.10.50 to-ports=8000 comment="NVR from outside"Risk: this port is open to the whole internet. Cameras, NVRs and Remote Desktop are constant targets, and many have known vulnerabilities. If you must open a port:
- Restrict access to specific IPs:
/ip firewall address-list add list=allowed-remote address=198.51.100.25 comment="Manager home"
/ip firewall nat set [find comment="NVR from outside"] src-address-list=allowed-remote- Use a strong password on the device and keep its firmware up to date.
- Never expose the management panel of a router, switch or server directly.
More details are in NAT types on MikroTik.
Method 2: DDNS with IP Cloud
If your IP changes, you cannot reach the router by IP address. MikroTik’s free IP Cloud service gives the router a stable name:
/ip cloud set ddns-enabled=yes
/ip cloud print
In the output, the dns-name field is a name like abcd1234.sn.mynetname.net that always points to your router’s current IP. Use this name in your VPN settings or camera app. DDNS on its own opens no ports; it only finds the address.
Method 3: a WireGuard VPN (recommended)
With a VPN, your device (laptop or phone) behaves as if it were inside the company network. Only one VPN port is open on the router, and nobody gets in without a valid key. WireGuard is built into RouterOS 7; it is fast, simple and secure, and has official apps for Windows, macOS, Android and iOS.
Configuration on the MikroTik
/interface wireguard add name=wg-remote listen-port=13231
/ip address add address=10.99.0.1/24 interface=wg-remote
/interface wireguard print
The last command shows the router’s public key; note it down.
Open the WireGuard port in the input firewall. This rule must sit above the drop rule at the end of the chain:
/ip firewall filter add chain=input protocol=udp dst-port=13231 action=accept comment="WireGuard" place-before=[find comment="input: drop everything else"]If your firewall rules have different comments, drag the rule into place in Winbox.
Creating the client
In the WireGuard app on the laptop or phone, create an empty tunnel; the app generates the client’s private and public keys. Add the client’s public key on the router as a peer:
/interface wireguard peers add interface=wg-remote public-key="CLIENT_PUBLIC_KEY" allowed-address=10.99.0.2/32 comment="Manager laptop"Tunnel settings in the client app:
[Interface]
PrivateKey = (generated by the app)
Address = 10.99.0.2/32
DNS = 192.168.10.1

[Peer]
PublicKey = ROUTER_PUBLIC_KEY
Endpoint = abcd1234.sn.mynetname.net:13231
AllowedIPs = 192.168.10.0/24, 10.99.0.0/24
PersistentKeepalive = 25AllowedIPsdecides which traffic goes through the tunnel; in this example only company network traffic. The user’s internet traffic takes its normal route.- Create one peer per user with its own address (
10.99.0.3,10.99.0.4and so on) so you can cut off each person’s access separately.
Access to the internal network
With the firewall built in Network security with MikroTik, traffic from the tunnel to the internal network is allowed, because only new connections from the WAN list are blocked. If you want VPN users to reach the router’s Winbox too, add wg-remote to the LAN list. If not, leave it out.
To restrict each user’s access, write rules in chain=forward, for example the accountant may only reach the accounting server:
/ip firewall filter add chain=forward src-address=10.99.0.3 dst-address=!192.168.10.40 action=drop comment="Accountant only to accounting server" place-before=0Comparing the three methods
- Port forwarding: quick to set up, but each device is directly exposed to the internet. Only for limited cases, with IP restrictions.
- DDNS: not an access method; it only solves the changing-IP problem and is used together with the other two.
- VPN: a little more set-up, but the most secure way: one port, full encryption and per-user access control.
For access from outside, first know your IP situation: static, changing or CGNAT. Solve the changing-IP problem with IP Cloud and, wherever possible, set up a WireGuard VPN instead of opening device ports. For connecting branches you can use the same WireGuard, or an L2TP connection.